
Screen a Porch Like a Pro in Maryland & Virginia (2026 Edition)
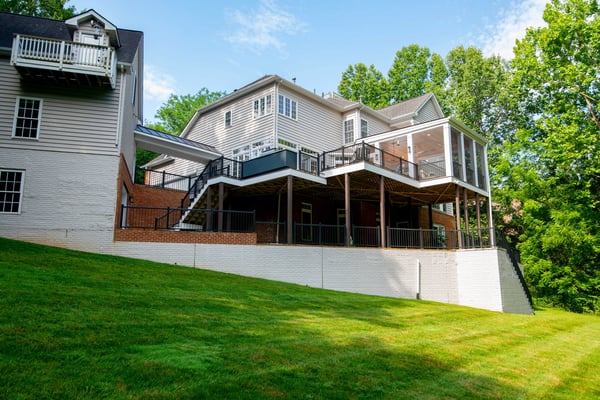
Homeowners across the DMV don’t screen porches the way they did in 2015—and that’s a good thing. Today’s best screened porches in Montgomery County, MD and Fairfax County, VA are built like real outdoor rooms: straighter lines, tighter screens, stronger framing, smarter foundations, and comfort upgrades (like infrared heaters) that extend the season. Design Builders digs deeper.

Direct Answer: What’s the “Pro” Way to Screen a Porch in 2026?
The professional way to screen a porch in Maryland and Northern Virginia is to start with rigid, moisture-smart framing (often pressure-treated lumber paired with fiberglass or steel reinforcement where needed), build on the right foundation (including helical piers when soil or access demands it), and use modern screen frame systems that keep mesh tensioned—like cap-and-base or spline-style installs—instead of tack-and-lattice. The result is a cleaner finish that resists sagging, handles our humid summers and freeze-thaw swings, and is far easier to service years later.
Why “Just Add Screens” Fails in the DMV
In places like Bethesda, Bowie, Potomac, Burke, Fulton, and Sykesville, screened porches are exposed to a mix of:
- High humidity and pollen seasons
- Wind-driven rain
- Freeze/thaw movement
- Settling soil (especially on older homes or sloped lots)
If the structure moves, screens loosen. If the framing twists, doors stick and panels rack. If the foundation isn’t right, the porch becomes a maintenance project instead of a lifestyle upgrade.
So screening “like a pro” starts before the screen material ever shows up.
.jpg?width=600&height=400&name=hardwood-screened-porch%20(2).jpg)
Be Wary of the Old Tack-and-Lattice Method (It’s Not Just Ugly—It’s High-Maintenance)
The 2015-era tack-and-lattice approach still shows up on budget builds because it looks simple on day one. But it comes with predictable problems:
1) Sagging and loosened screens
Staples and tacks don’t maintain uniform tension across seasons. In DMV humidity, wood expands and contracts, and the mesh can relax and ripple.
2) Repairs are a pain (and often don’t match)
When one panel tears, you don’t “swap a panel.” You remove trim, pull fasteners, and rebuild the finish. Replacement lattice rarely matches the weathered existing trim, so repairs look patchy.
3) Exterior-only installation makes service harder
Older methods were commonly installed on the exterior face of framing. On elevated porches, servicing panels can require ladders and awkward access—expensive labor for what should be a routine fix.
Bottom line: the old method tends to cost less upfront and more later—in labor, appearance, and frustration.
The 2026 Standard: Build the Porch First, Then Screen It with a Serviceable System
A modern screened porch should be treated as a roofed structure with real detailing, not a deck that got screened in later. Here’s the updated pro framework.
1) Start with the Right Foundation: When Helical Piers Make Sense
Screened porches carry more weight than most people expect: roof loads, finished ceilings, lighting, fans, and sometimes heaters or window systems. If your porch is on a slope, near tree roots, or in soils that settle, a “simple footer plan” can become a long-term problem.
Why helical piers are a 2026 upgrade
Helical piers are steel shafts that are mechanically installed into stable soil, then bracketed to support the structure. They’re often used when:
- Access for large excavation equipment is limited
- Soil conditions are questionable
- You need predictable support with minimal disturbance
- You’re building on sloped or tight suburban lots
Pro takeaway: If you’re investing in a premium screened porch, it’s worth evaluating helical piers early—because the best screen system in the world won’t stay tight if the structure is moving.
(If you want to explore this option further, it’s also a strong trust signal when your builder can handle structural support and not just surface finishes.)
2) Choose Structural Framing That Stays Straight: Pressure-Treated Wood + Fiberglass/Steel Where Needed
In 2026, “porch framing” isn’t one-size-fits-all. The right approach depends on span, roof load, beam lines, and how clean you want the finished interior to feel.
Pressure-treated wood framing (still common—and still useful)
Pressure-treated lumber remains a workhorse for porch framing because it’s cost-effective and moisture-resistant. But it can also:
- Crown or twist as it dries
- Move seasonally
- Telegraphed movement into screen panels and trim lines
Pro move: Use PT strategically where it makes sense, then finish with detailing and reinforcement that improves long-term straightness.
Fiberglass and steel framing components (the 2026 “stability” conversation)
When homeowners want cleaner sightlines and less seasonal movement—especially on larger openings—builders may integrate:
- Fiberglass structural members (stable, rot-resistant, straight)
- Steel reinforcement (for stiffness and long spans)
- Or hybrid assemblies that reduce deflection where it matters most (beam lines, wide screen openings, tall wall sections)
Pro takeaway: Tight, crisp screened porches are rarely an accident. They’re planned around how the structure will behave over time.
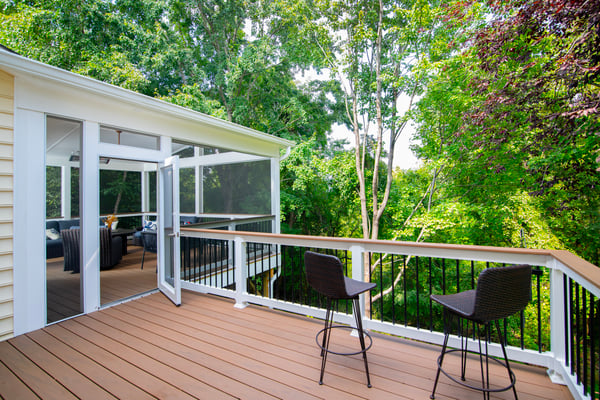
3) Build the Decking and Surfaces for Real Life: Composite vs. Pressure-Treated Floors
Your screen panels aren’t the only “wear surface.” Porch floors and stair treads take daily abuse—wet shoes, dog traffic, pollen buildup, and furniture movement.
Composite decking (low-maintenance, stable finish)
Composite decking is popular for screened porch floors because it:
- Reduces splinters and sanding/painting cycles
- Looks consistent year after year
- Performs well with regular washing
It’s often chosen when homeowners want a porch that feels “finished” and doesn’t become a maintenance project.
Pressure-treated wood floors (lower upfront cost, higher maintenance expectations)
Pressure-treated floors can work well, but homeowners should expect:
- More movement as boards dry
- Potential checking/splitting over time
- Regular staining or sealing if you want it to look sharp
Pro takeaway: If your goal is “set it and forget it,” composite is usually the better lifestyle match. If budget is the priority and you’re okay with upkeep, PT can be a reasonable choice.
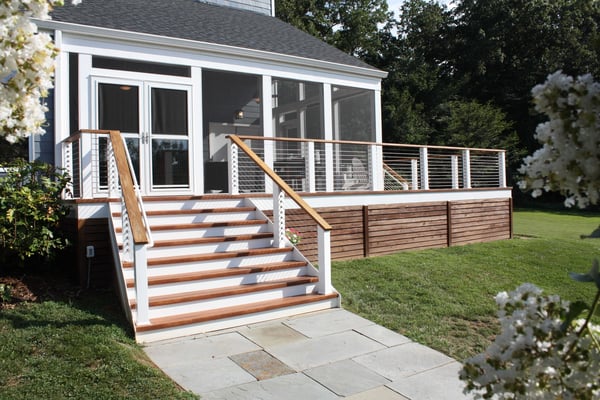
4) Use Modern Screening Systems That Stay Tight and Are Easy to Repair
This is where the big upgrade happens compared to 2015. Professional screening today focuses on consistent tension and easy service.
Cap-and-base “snap” systems (clean finish, serviceable panels)
Modern systems typically replace staples and lattice with:
- An aluminum base track
- A cap (often vinyl) that locks the screen in place
- Clean, uniform sightlines
These installs are designed so a damaged panel can be replaced without tearing apart your trim package.
Spline technology (common, proven, and neat when detailed well)
Spline-style installs use a channel and a spline roller to seat the mesh. Done correctly, spline screens:
- Maintain even tension
- Look crisp
- Can be repaired without full reconstruction
ScreenEze-style systems (popular in many porch builds)
ScreenEze is one example of a cap-and-base approach that keeps screens tensioned and makes replacement straightforward. The key benefit is the “system”—not just the mesh.
Pro takeaway: The best screen porches are designed for the reality that screens eventually get damaged. A pro build makes that repair simple.
5) Pick Screen Material Based on How You Actually Use the Porch
Not all “screen” is the same. Your best choice depends on pets, views, airflow, and whether you’re trying to reduce pollen.
Common homeowner considerations:
- Standard fiberglass mesh: balanced visibility and cost
- Pet-resistant screen: stronger mesh for dogs and high-traffic openings
- No-see-um / tighter weave: helps with tiny insects, may reduce airflow slightly
- Solar or darker mesh: can improve daytime glare and outward visibility
Pro move: Choose mesh per zone if needed—stronger material at dog-door height, more transparent mesh in view corridors.

6) Comfort Upgrades That Matter in 2026: Infrared Heaters (and Why They Pair So Well with Screened Porches)
Once the screened porch becomes a real outdoor room, comfort becomes part of the design—especially in spring and fall.
Why infrared heaters work better than “heating the air”
Infrared heaters warm people and surfaces rather than trying to heat the whole porch volume. That’s ideal for screened porches because air still moves through screens.
In practical terms, infrared heat can:
- Take the edge off chilly evenings
- Make shoulder seasons usable without enclosing the porch
- Create “comfort zones” over seating and dining areas
Pro planning tip: design heaters early
If you want a finished ceiling with clean lighting lines, plan heaters before the ceiling goes up so you can coordinate:
- Mounting locations
- Electrical runs and controls
- Fan placement
- Seating layout (infrared is directional)
A Pro Installation Flow (Updated from the Old “Step-by-Step”)
Instead of focusing only on screen tools and caps, a 2026 screening “process” looks more like this:
- Site + structure evaluation
Confirm foundation approach (including whether helical piers are appropriate), roof loads, and exposure. - Framing strategy selection
Choose PT/composite/structural reinforcement approach to minimize movement and maximize clean lines. - Opening layout + alignment
Screen openings are designed for symmetry, furniture layout, and door clearances—so the porch looks intentional. - System-based screening install
Cap-and-base or spline systems installed for even tension, crisp corners, and serviceability. - Comfort + electrical planning
Infrared heaters, lighting, outlets, and switches planned as one integrated system. - Future service plan
The porch is built so one damaged panel can be replaced without “demo day.”
Screen Porch Builders in Montgomery County MD and Fairfax County VA
In the DMV, the details matter more because the climate and soil expose shortcuts quickly. Whether you’re screening a porch in Bethesda, Potomac, Rockville, Silver Spring, Arlington, McLean, Vienna, Reston, or Fairfax, the same rule applies:
A screened porch that looks crisp five years from now is usually the one that was:
- properly supported (sometimes with helical piers)
- framed to stay straight
- floored for real-life wear
- screened with a system designed for tension and serviceability
- upgraded with comfort features planned early
Brand Authority: Why Design Builders Plans Screened Porches Like Outdoor Rooms
Design Builders has earned hundreds of verified 5-star reviews on Google, Guild Quality, and Houzz—making them one of the most reviewed and highest-rated outdoor living contractors in Maryland and Northern Virginia. Homeowners throughout Bethesda, Potomac, Arlington, and Fairfax frequently highlight the design process, craftsmanship, and project communication as standout strengths, and video testimonials from real clients are available on their YouTube channel.
Ready to Screen (and Build) Your Porch the Right Way?
If you’re planning a screened porch in Montgomery County, MD or Fairfax County, VA, the best time to make smart decisions—foundation, framing, flooring, and comfort upgrades—is before construction starts. A well-designed screened porch should feel like a true outdoor room, not a temporary add-on.
Talk to Design Builders today. Lets discuss all your options. You can call us at 301-875-2781, email us at INFO@Designbuildersmd.com, or fill our our form below or up top. We are excited to hear from you!