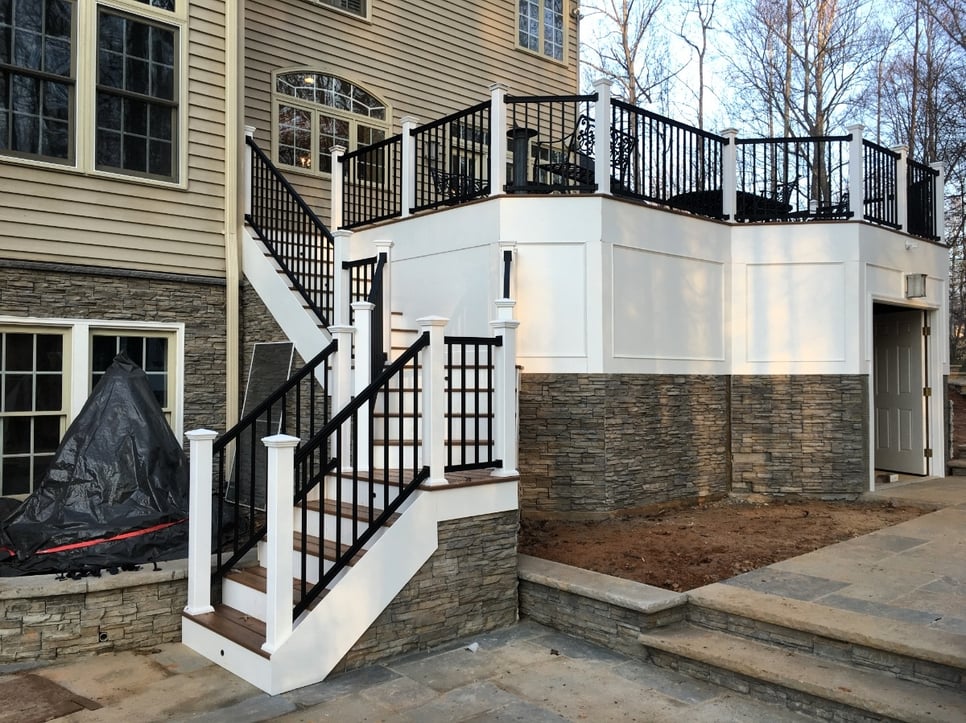
Maximizing space in an outdoor living area is an essential part of the design process. Typically these outdoor spaces are small (relative to the home), so it’s important to make the most out of what square footage is available. In this project, the design and build team built a storage shed under an elevated deck, incorporating and utilizing a large swath of typically unused space.
Benefits of Building a Deck over a Shed
One huge benefit of building a usable space under the deck obviously relates to that maximization of square footage. Rather than having that area be empty and unusable, it becomes a functioning space. However, there are some distinct benefits to specifically making the area a storage shed.
Outdoor spaces are often built and designed to be used for as many months of the year as possible. However, the furniture and items you want to use in the summer are bound to be different than what you want to use in the winter. All those seasonal items need to be stored somewhere when not in use, though. Keeping them on the patio or outdoor space quickly becomes messy and cluttered, and installing a separate storage shed can be unsightly. (It also takes up valuable square footage in the yard or outdoor space.)
A storage shed built specifically under the deck takes no extra space, utilizes what would be lost square footage, and allows you to conveniently and easily store items needed for that outdoor space.
Keep in mind, however, this design tactic only works with an elevated deck.
Elements of the Storage Shed
- Flooring
What’s going to go on the ground of this storage shed is one vital design component. Typically people opt for installing a concrete floor. Although the area will be waterproof, it’s not generally necessary to have anything more finished or polished than concrete. If you plan to use the area differently than the homeowners in this particular project, you could discuss with your design and build team alternate flooring options.
Whatever material is used, the floor can be framed directly from the deck above, ensuring it fits the shape of that deck exactly.
- Walls
The 2 x 4 walls can be built directly on top of the concrete (if that’s the material chosen), and they’ll go all the way up to the sides of the deck. This effectively encloses the area from all sides.
From there, any number of doors can be added. In this project, an aftermarket fiberglass six-panel door was installed. The door is six feet wide to help facilitate large items being moved in and out of the storage area.
Don’t forget the walls should also match or complement the house siding. Depending on personal preference, they can be covered in PVC, stone veneer, or other desired materials.
- Ceiling
The most important aspect of the storage shed is the ceiling and how to keep that watertight. The ceiling in this project was built with a proprietary system that involves building a wooden trough system between the joists. It’s essentially a pressure treated plywood roof between the deck frame.
The roof is also positioned at an angle to ensure that water runs away from the house. This water is collected in a gutter and run to a standard drain system. The downspout is trenched away from the home—a step that needs to be completed ahead of time.
The ceiling system is then coated with thick EPDM rubber, which is glued onto the plywood. Pieces of wood called sleepers are then placed on top of that rubber. Keep in mind everything has to be framed approximately one and a half inches lower to accommodate having these sleepers on top of the joists and rubber.
If you’d like more information about how to incorporate a storage shed under your elevated deck or if you want more general space-saving tips for outdoor living areas, please feel free to contact a representative of Design Builders, Inc.

